Translation

12.6.12

Where Your Focus Goes, So Does Your Exposure

The subject line up there is a bit of a generalization, yet true for most cameras, be they DSLR or point and shoot. And not a lot of people realize this fact. Many of my students just assume the camera makes one determination about the lighting in the scene and that is that. If only it were that simple (and it is when you use Manual mode and don’t let the camera decide, but that’s another topic).
The truth is, most of the time your camera will alter the selection it has made for shutter speed, aperture and ISO (depending on which variable you have allowed it to control based on mode settings) because you focused in one spot or another. This happens often in the matrix or evaluative metering modes, when the camera is allowed to use all of its metering point as it sees fit. It will not happen when using spot metering, but can, occasionally, when using center-weighted. Concentrating on the full metering mode then, be aware of where you are focusing as that may not be where you want to meter.
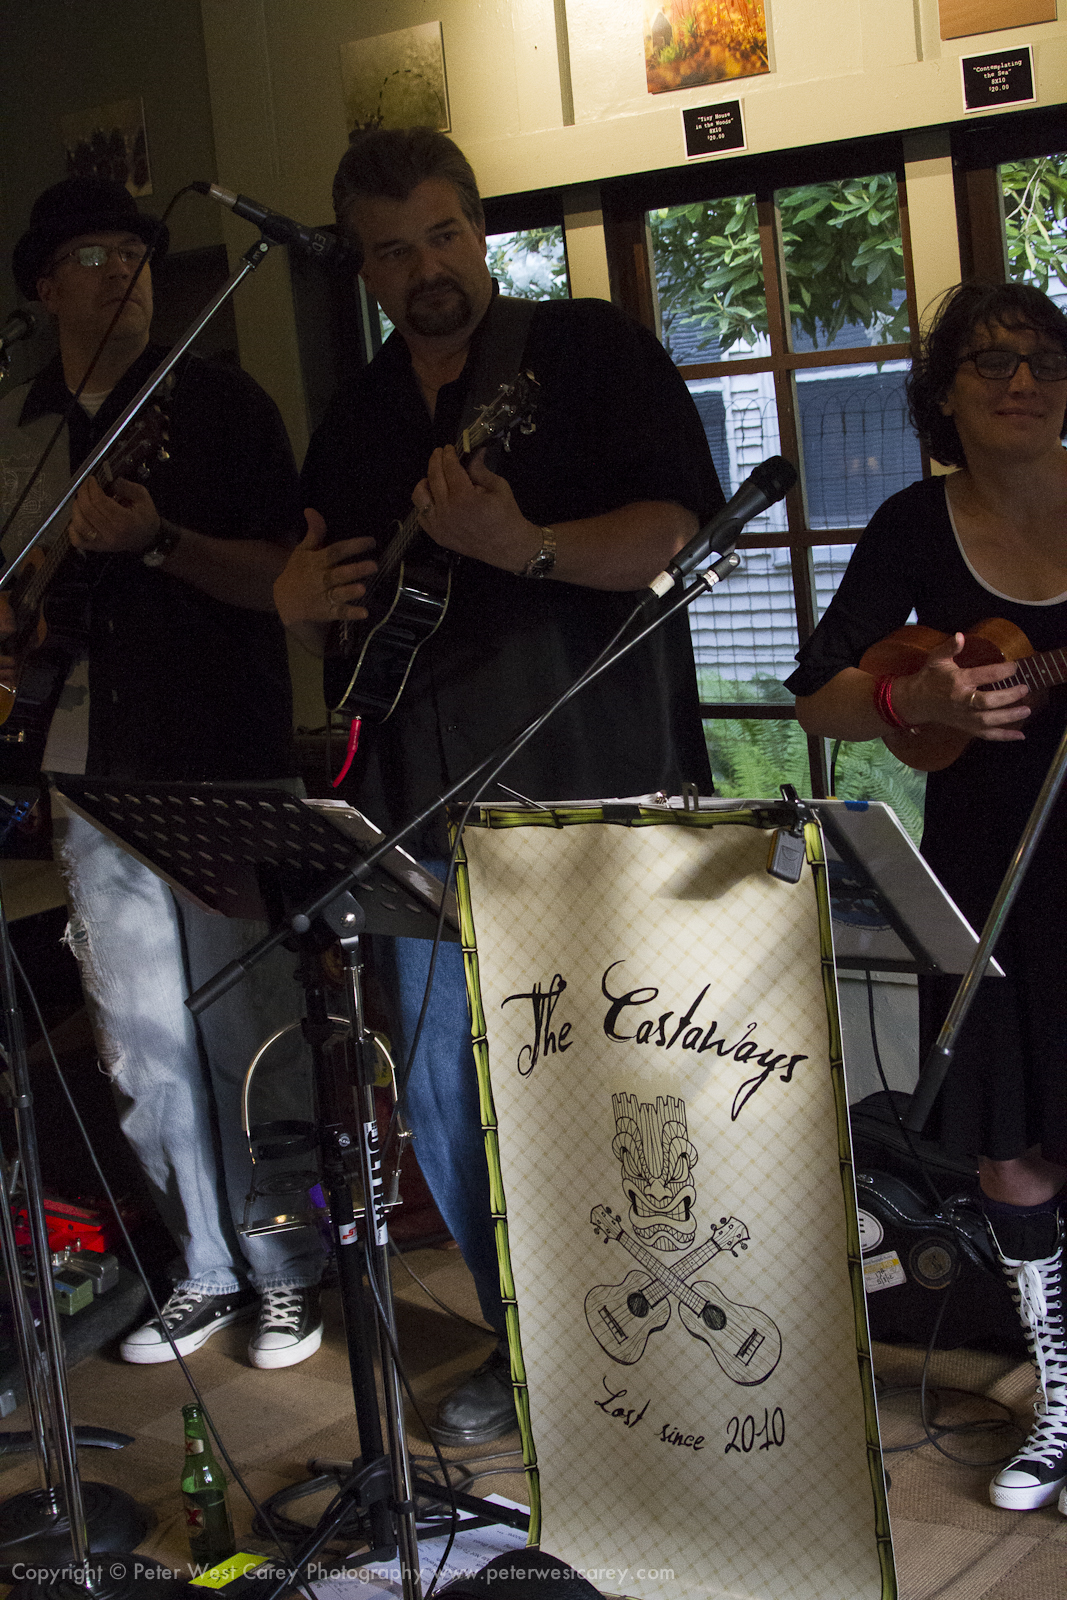
For instance, take this unedited scene from a coffee shop concert I shot this weekend for an ukulele band named The Castaways:

The exposure looks about right. The settings are Canon 7D, ISO 6400, 35mm, f/5.0, 1/60. For reference sake, I was using evaluative mode (using all the metering points) and my camera has three vertical areas to focus on in the focus mode I was using (the following effect is existent in most any of the focusing modes, be it single point or in a group). Those areas look like this:

In the shot up top, I am focused on the red location. Now, let’s move to the green location, right in the center.

The settings are Canon 7D, ISO 6400, 35mm, f/5.0, 1/160. That’s 1 and 1/3 stops faster. Can you guess why?
It’s because the area of focus, when metered, has more of the light banner (which is also being lit by direct outdoor light) to contend with. It sees more lightness, as compared to the first focus point, which had more black and dark areas, and compensates. What’s going to happen when I focus on the banner, or the blue location?

Well now, things are looking bleak. Canon 7D, ISO 6400, 35mm, f/5.0, 1/250. 2/3rds of a stop darker than before and two full stops darker than the image we started with, which was a decent exposure.
If you are not shooting on Manual, and there is no hard-fast rule that says you need to, then be aware that your camera may change its decision on metering when you change focus. Give it a try yourself to see if your camera changes its mind with your focus.
Set up a target with black, gray and white sections that will align with your focus points. Keep light constant. Move the focus points to the black, then gray, then white and see if your metering changes. Try this in Aperture Priority mode to easily see the shutter speed change. Make sure you tap the shutter half way to start meeting anew after moving the focus points. Don’t know how to move your focus points? It’s time to bust out your manual.
This effect is neither good nor bad. It’s simply something to be aware of.

10.6.12

29 Shots of Dogs Sticking Their Heads out of Car Windows [Humor]

OK – lets put this in the fun basket – it’s certainly not about technically amazing shots. I was surfing on Flickr the other night and came across the first shot below – a cute dog enjoying what all dogs enjoy – putting his head out of a moving car’s window.
orelhas ao vento
One thing led to another and 25 minutes later I’d had a good chuckle and compiled the following – canine freedom in 20 shots. Enjoy.
DOGGLES FOR THE WIN
on the road
Not A Care In The World
flappin' gums
driving along in the automobile...
Max's Mouth
anti botox brigade
mundão velho sem coleira
Through an open window my fur blows....
Looking out from the car
52/52 leaving 2011
Great night out!
4/365
Lovin Life
069:365
Levittown
Riding with the wind
stuck in traffic
mukha enjoying the wind
Dog in car window
Through the Wind-ow
contentment
Rural Reflection
Warp Speed!
breeze buddies
Tasting the Wind
Isaac Flying
Day 8: Whoosh!


10 Photographic Assignments to Hone Your Skills

A few months ago I wrote about how setting myself photographic assignments was one of the things that had helped me to improve my photography the most.
Sunset Shooters
The idea was that it is often when you put yourself into a situation specifically for photography that you are forced to practice the theory that you know and you see your photography improve.
The assignments I mentioned were all different types of photography or places to take photos – weddings, road trips, sporting events, festivals, portrait sessions, concerts, trips to the zoo etc.
What I didn’t mention in the post was another set of ‘assignments’ or challenges that I’ve set myself over the years which have also led to a lot of photographic growth.
In these challenges I tend to set myself the challenge to only shoot in one particular way for a period of time (for me it is usually a weekend challenge as that is when i take most of my images).
These challenges all relate to your camera and limiting yourself in some way to either switch off some element of the automated aspects of your camera, limiting yourself to really hone a skill or to practice some kind of technique.
While this isn’t really a natural way to shoot – I find that focusing in on one particular aspect or skill in photography at a time can really help to see improvements in that period of time which means when you next need that skill you’re all ready to go!
Here’s a few suggestions based upon weekends that I’ve done:
  1. The one focal length/lens weekend – either choose a single prime lens or a focal length at one end of a zoom and only shoot at that focal length for a whole weekend (choose one you don’t naturally shoot in a lot). This teaches you a lot about that focal length and makes you think about your composition of your shots.
  2. The one aperture weekend - this can be hard if you shoot a wide range of subjects like I do but choose an aperture and try to stick to it for a period of time. To do this you’ll find it easier if you shoot in Aperture Priority mode – you’ll also probably find it best to choose either to shoot at one end of the aperture spectrum. This will teach you a lot about depth of field and get you thinking also about how to balance shutter speeds and ISO to get well exposed images.
  3. The one shutter speed weekend - similarly to the aperture challenge this can be challenging but spending some time either looking to capture subjects with long or very fast shutter speeds will teach you a lot. To do this shoot in Shutter Priority Mode.
  4. Manual Exposure Mode Weekend - if you don’t venture into fully manual shooting that much set yourself a challenge to shoot in manual mode for a weekend. This is perhaps the best way possible to teach yourself about exposure!
  5. Manual Focusing Weekend - similarly if you rely upon your camera to always focus for you in Auto focus – switch to a weekend of just shooting with manual focus. This will break you out of your laziness and help you to really think about focal points.
  6. Switch cameras - got an older camera in your cupboard that you’ve been neglecting? Perhaps its an old film camera or an old digital camera without all the bells and whistles of your current one? Take it for a spin – sometimes older cameras require you to think more about settings and not rely upon the features of your modern camera. Shooting with film cameras also makes you slow down and get the shot right the first time.
  7. Compositional Rules - pick a ‘rule’ like the Rule of Thirds and try to adhere to it in every shot you take over a weekend. Alternatively choose to break the rule as much as possible but still end up with ascetically pleasing shots.
  8. Explore a Technique - spend a weekend really honing your skills in a particular shooting technique. For example you might like to spend time working on using Fill Flash in your shots – or Slow Sync Flash – or Zoom Blur – or Panning etc
  9. Lighting Technique - similarly set yourself the challenge to practice your skills with a particular lighting. It might be Natural light, window shots, one light portrait setups, silhouettes, classic lighting etc
  10. Recreate someone else’s work - one last one that I am borrowing from a friend. My friend chooses an image each week from a photographer that he admires and he sets out to recreate it. While he never passes the shots he takes off as his ideas he finds it useful to analyse the work of others and to then try to recreate those shots – in doing so he finds he learns a lot.